It’s been a few years since I first started using Elixir and Phoenix. Before that, I was really into JavaScript (and still am) and enjoyed (and still do) using different front-end JavaScript frameworks like React, Vue and Angular because they made my life easier with all of their great features. However, LiveView was love at first sight. It was different, but in a good way, and it allowed me to prototype much faster.
Recently, I found a really cool UI library that I wanted to use in a LiveView project, but when doing so, I hit many walls because of the issues between JavaScript’s client-side nature and LiveView’s server-side, page-diffing approach. In this post, I will be sharing my insights on overcoming this particular challenge.
A little background
What is LiveView?
Phoenix LiveView is an Elixir library that enables rich, real-time user experiences with server-rendered HTML. LiveViews are Elixir processes that receive events, update their state, and render updates to a page as diffs.
A LiveView in Elixir is essentially a process that maintains a state. This state is dynamically updated in response to events originating from either the browser or the server using internal application messages. These updates can subsequently trigger page updates in the browser through the application of differential rendering or diffs.
How does LiveView work?
A LiveView starts as a regular HTTP request and HTML response. Upon client connection, it transitions into a stateful view, ensuring the delivery of a regular HTML page, even if JavaScript disabled. Whenever the view changes or its socket assigns (which contains the state of the page) are changed, it is automatically re-rendered and the updates are pushed to the client.
Here’s a video from The Pragmatic Studio which has a deeper explanation of how this process works:
Why JavaScript and LiveView don’t always get along?
As mentioned earlier, LiveView allows for server-side rendering, while JavaScript operates within the browser. The issue with this is that LiveView triggers page updates upon receiving events using a differential rendering technique. Consequently, the LiveView process maintains the state of the DOM, updating it based on received messages. If the DOM undergoes changes in the browser (due to JavaScript or other factors), LiveView may override these alterations because they weren’t reflected in its internal DOM state.
Different ways to make JavaScript and LiveView play nice
Pushing changes to the client using LiveView.JS
This module provides commands for executing JavaScript utility operations on the client. These commands go from adding and removing classes to dispatching DOM events to different elements.
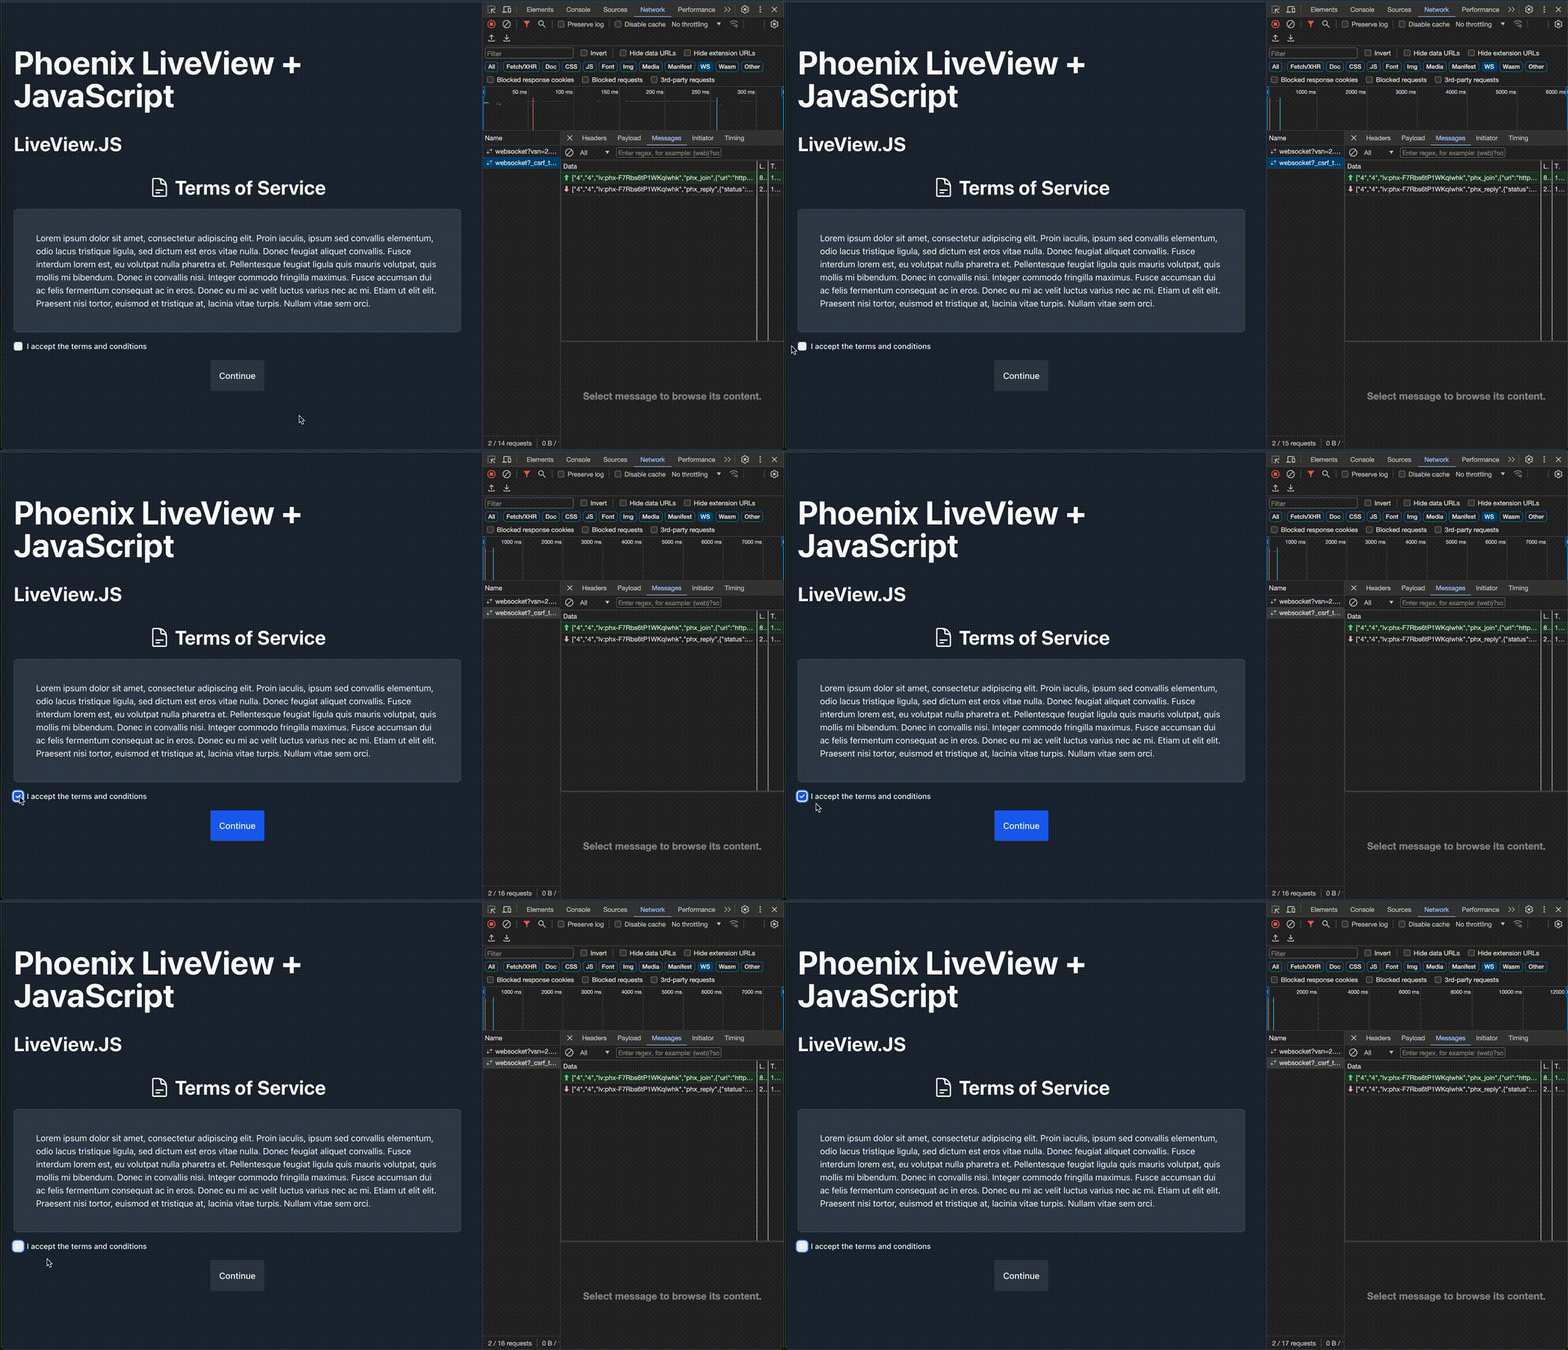
In this example, we’re going to see how to enable a button when the checkbox for accepting the Terms of Service of a page is checked.
One way to face this problem is to have a tos_accepted flag in the socket assigns that is toggled whenever the checkbox is changed, and this flag can be used to enable or disable the button.
def handle_event("toggle_tos", params, socket) do
  {:noreply, assign(socket, :tos_accepted, !is_nil(params["tos_accepted"]))}
end

def render(assigns) do
  ~H"""
    ...
    <form>
      <input
        id="tos-checkbox"
        name="tos_accepted"
        type="checkbox"
        checked={@tos_accepted}
        phx-change="toggle_tos"
      />
      ...
      <button id="continue-button" disabled={!@tos_accepted}>
        Continue
      </button>
    </form>
    ...
  """
Doing this means that every time the checkbox changes its state, a message is sent to the server, the server processes that message, updates the state and responds with a page update to the browser.
Although executing this task is pretty much effortless thanks to LiveView’s usage of Phoenix Channels, it’s not worth doing because enabling and disabling the button is something that happens in the client so the server shouldn’t interfere (not on this case at least). That being said, we can use the JS.toggle_attribute/2 function to toggle the disabled attribute for the button every time the checkbox state changes.
def render(assigns) do
  ~H"""
    ...
    <form>
      <input
        id="tos-checkbox"
        name="tos_accepted"
        type="checkbox"
        phx-change={JS.toggle_attribute({"disabled", "true"}, to: "#continue-button")}
      />
      ...
      <button id="continue-button" disabled>
        Continue
      </button>
    </form>
    ...
  """
end
Doing the later means that no trip to the server is made whenever the checkbox changes. Also, you can even pipe multiple JS commands and perform multiple actions in the client without needing to go through the server.
Solving complex client-side interactions with phx-hook
When creating a new socket (usually done in your app.js file), the constructor for the LiveSocket accepts the hook option as a parameter. This option references a list of hooks defined by the user that contains client callbacks for server/client interop. You can do a lot of things using hooks, sky is the limit! But you should know that the use of hooks is not always necessary and if you overuse them, you can end up with a lot of complex logic and repeated code.
Hooks have six life-cycle callbacks; mounted, beforeUpdate, update, destroyed, disconnected and reconnected. Although you might be able to tell what each of those callbacks do based on their names, you can check the official documentation here. All these hooks have access to different scoped attributes that you can also find in the documentation.
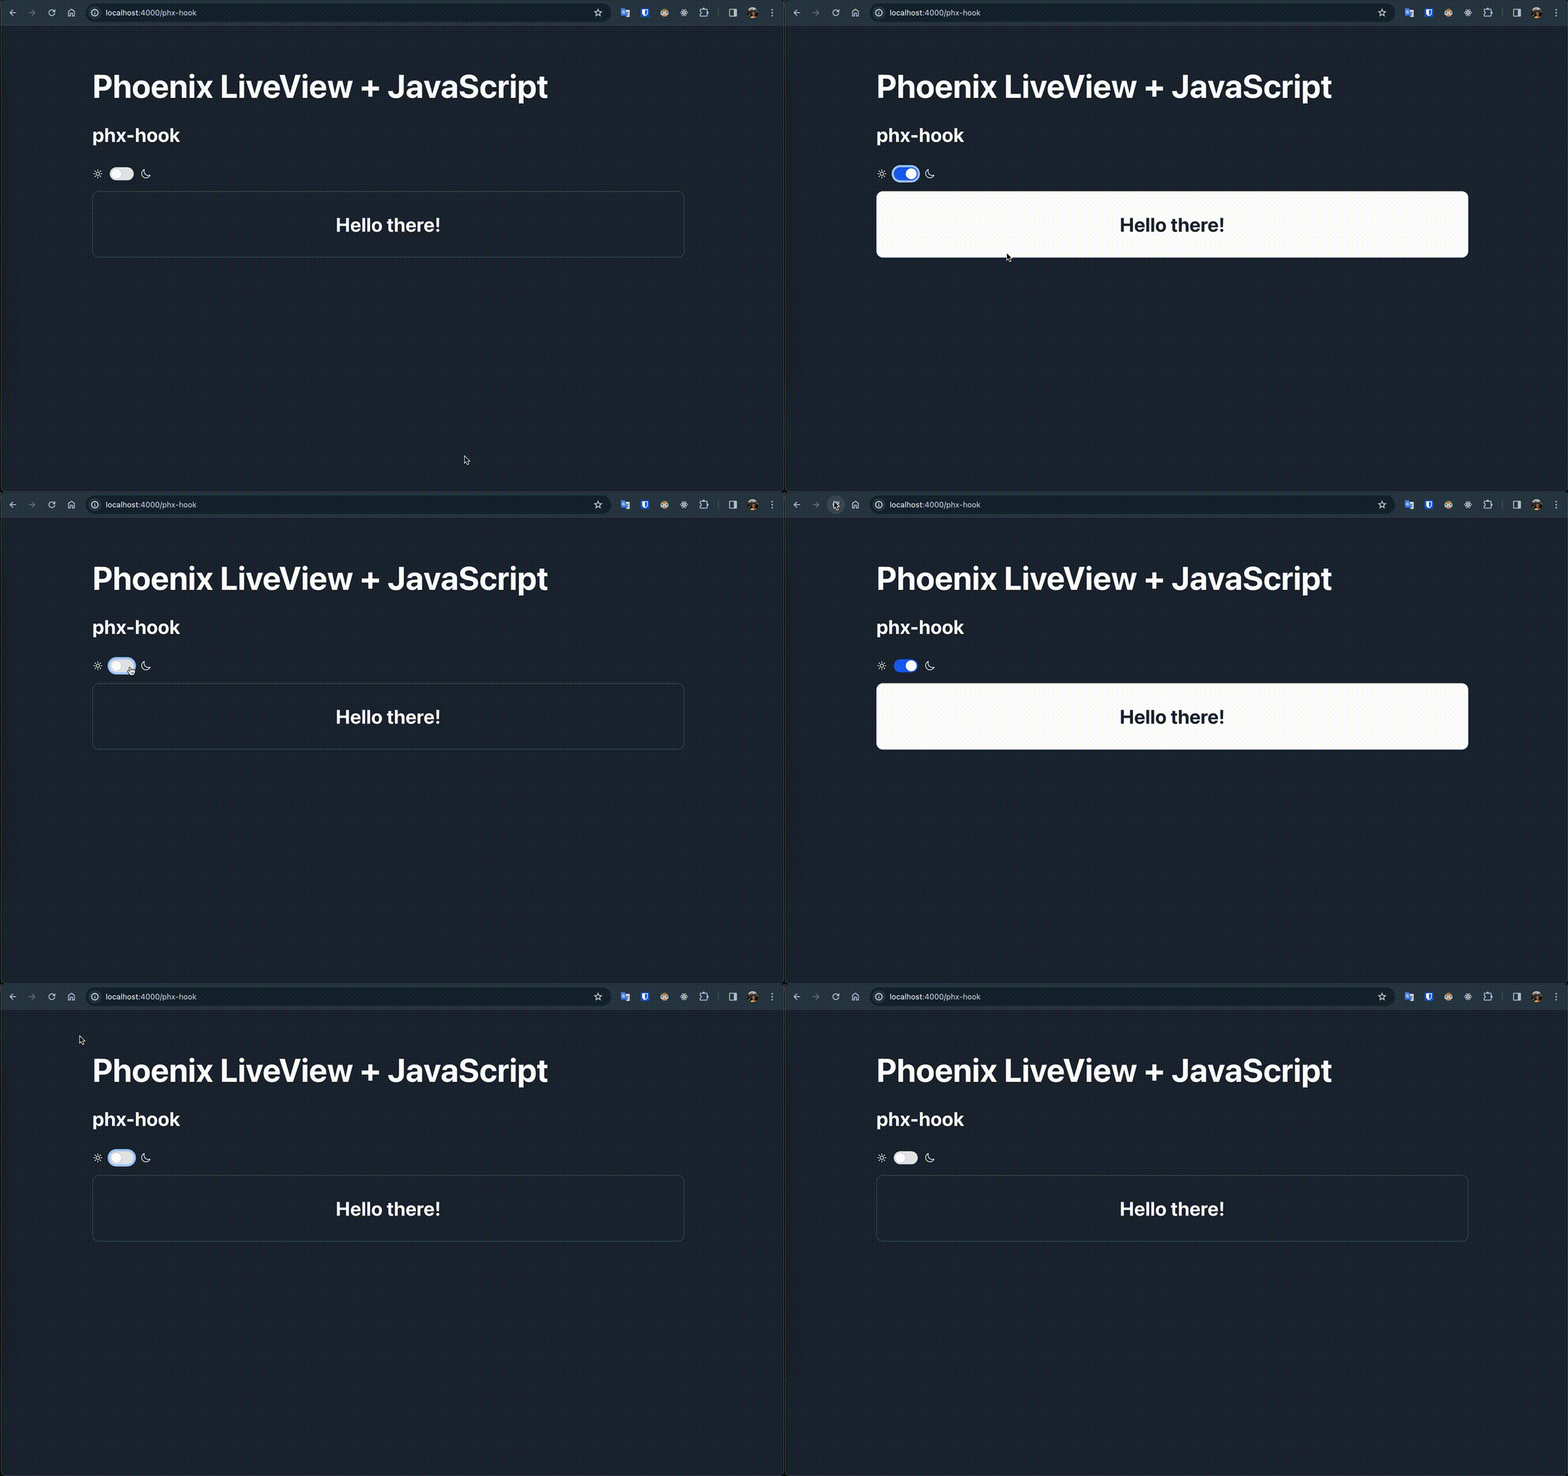
In this example, we’ll be talking about how to implement a very simple, yet useful, dark mode toggle.
First, we need to create our hook, and for that, we’ll create a hooks folder inside our assets folder which will contain the following index.js file:
const DARK_MODE_FLAG = 'dark-mode-enabled';

function toggleDarkMode(input) {
  const isDarkMode = localStorage.getItem(DARK_MODE_FLAG) === 'true';
  document.querySelector('html').classList.toggle('dark', isDarkMode);
  input.checked = isDarkMode;
}

const DarkMode = {
  mounted() {
    const inputId = this.el.dataset.darkModeInput;
    const input = document.getElementById(inputId);
    toggleDarkMode(input);

    input.addEventListener('change', (e) => {
      localStorage.setItem(DARK_MODE_FLAG, e.target.checked);
      toggleDarkMode(input);
    });
  },
};

export default {
  DarkMode,
};
The code above adds a listener to the darkmode input that, whenever it changes, it changes the DARK_MODE_FLAG stored in the local storage of the browser and then toggles the dark class used by tailwind in the html element.
After creating our hook, we need to add it to our LiveSocket in the app.js like this:
import hooks from '../hooks'

let liveSocket = new LiveSocket('/live', Socket, {params: { _csrf_token: csrfToken }, hooks}
Now that we have our JS hook in place, we just need to use it in our LiveView, and for this, we only need to set the phx-hook attribute in our element (which also needs to have a unique id attribute)
def render(assigns) do
  ~H"""
    ...
      <div
        id="dark-mode-toggle"
        data-dark-mode-input="dark-mode-input"
        phx-hook="DarkMode"
      >
        <.input id="dark-mode-input" type="toggle" />
      </div>
    ...
  """
end
That’s it! Now, every time the toggle with id dark-mode-toggle is changed, the flag in the local storage will change and the dark class is going to be toggled in the html element.
Ignoring unwanted updates using phx-update
There are some times that you might have parts of your liveview where you’re using JavaScript but you don’t need to update them at all. However, because of how LiveView works, they still get updated.
You could easily solve this problem by having a regular Phoenix template and embed a LiveView inside it using Phoenix.Component.live_render/3 and that’s fine, but this might introduce different issues like having multiple LiveViews embeded into that template, having to sync states between those LiveViews, and more.
Another workaround is to use Phoenix’ phx-update attribute. This attribute allow DOM pathching operations to avoid updating or removing portions of the LiveView, or to append or prepend the updates rather than replacing existing content. This attribute can have three values: replace, stream and ignore. You can read what each of those values mean in the documentation but today we’ll be focusing on the ignore value.
When setting phx-update=ignore on an element in the DOM, nothing inside that element (or that element itself) will be updated by the LiveView process. You need to be careful when using this because there might be things inside that element that DO need to be updated and they won’t (not even if setting phx-update=replace on the elements you wish to update).
In this example, we’ll see how to have a JS-powered accordion and a LiveView-handled counter both in the same LiveView.
First, let’s check what happens if we don’t use DOM patching at all. The code would look something like this:
def handle_event("update_counter", _params, socket) do
  {:noreply, assign(socket, :counter, socket.assigns.counter + 1)}
end

def render(assigns) do
  ~H"""
    <.accordion>
      <.accordion_item>
        <:title>What is LiveView?</:title>
        <:description><%= @live_view_description %></:description>
      </.accordion_item>
      <.accordion_item>
        <:title>What is JavaScript?</:title>
        <:description><%= @javascript_description %></:description>
      </.accordion_item>
    </.accordion>

    <button phx-click="update_counter">Update very useful counter</button>
    <h1><%= @counter %></h1>
  """
end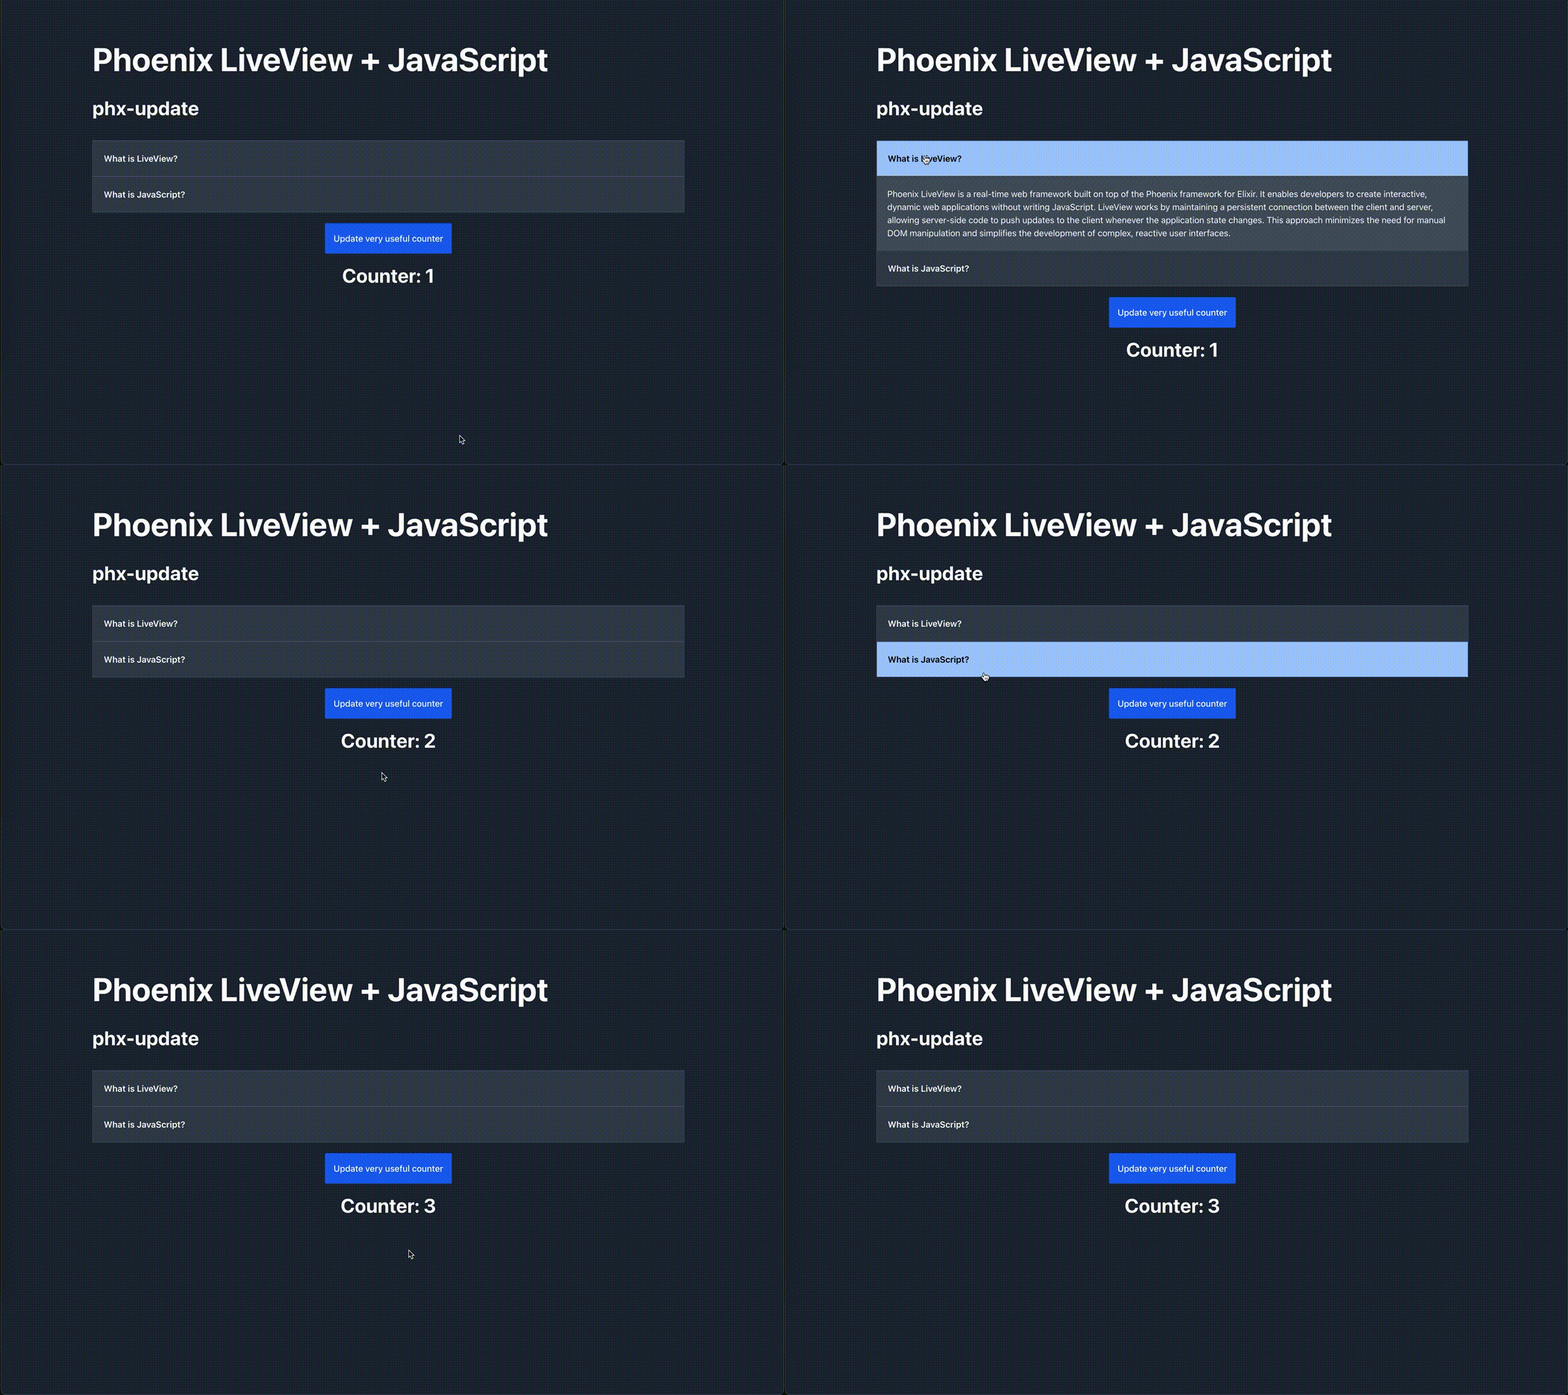
Now, with just adding a single line to the code (that is, setting phx-update="ignore"), this behavior gets fixed automatically because LiveView won’t change the accordion at all and the counter will still be updated (notice how the button and the counter are outside the phx-update="ignore" scope).
def render(assigns) do
  ~H"""
    <.accordion phx-update="ignore">
    ...
  """
end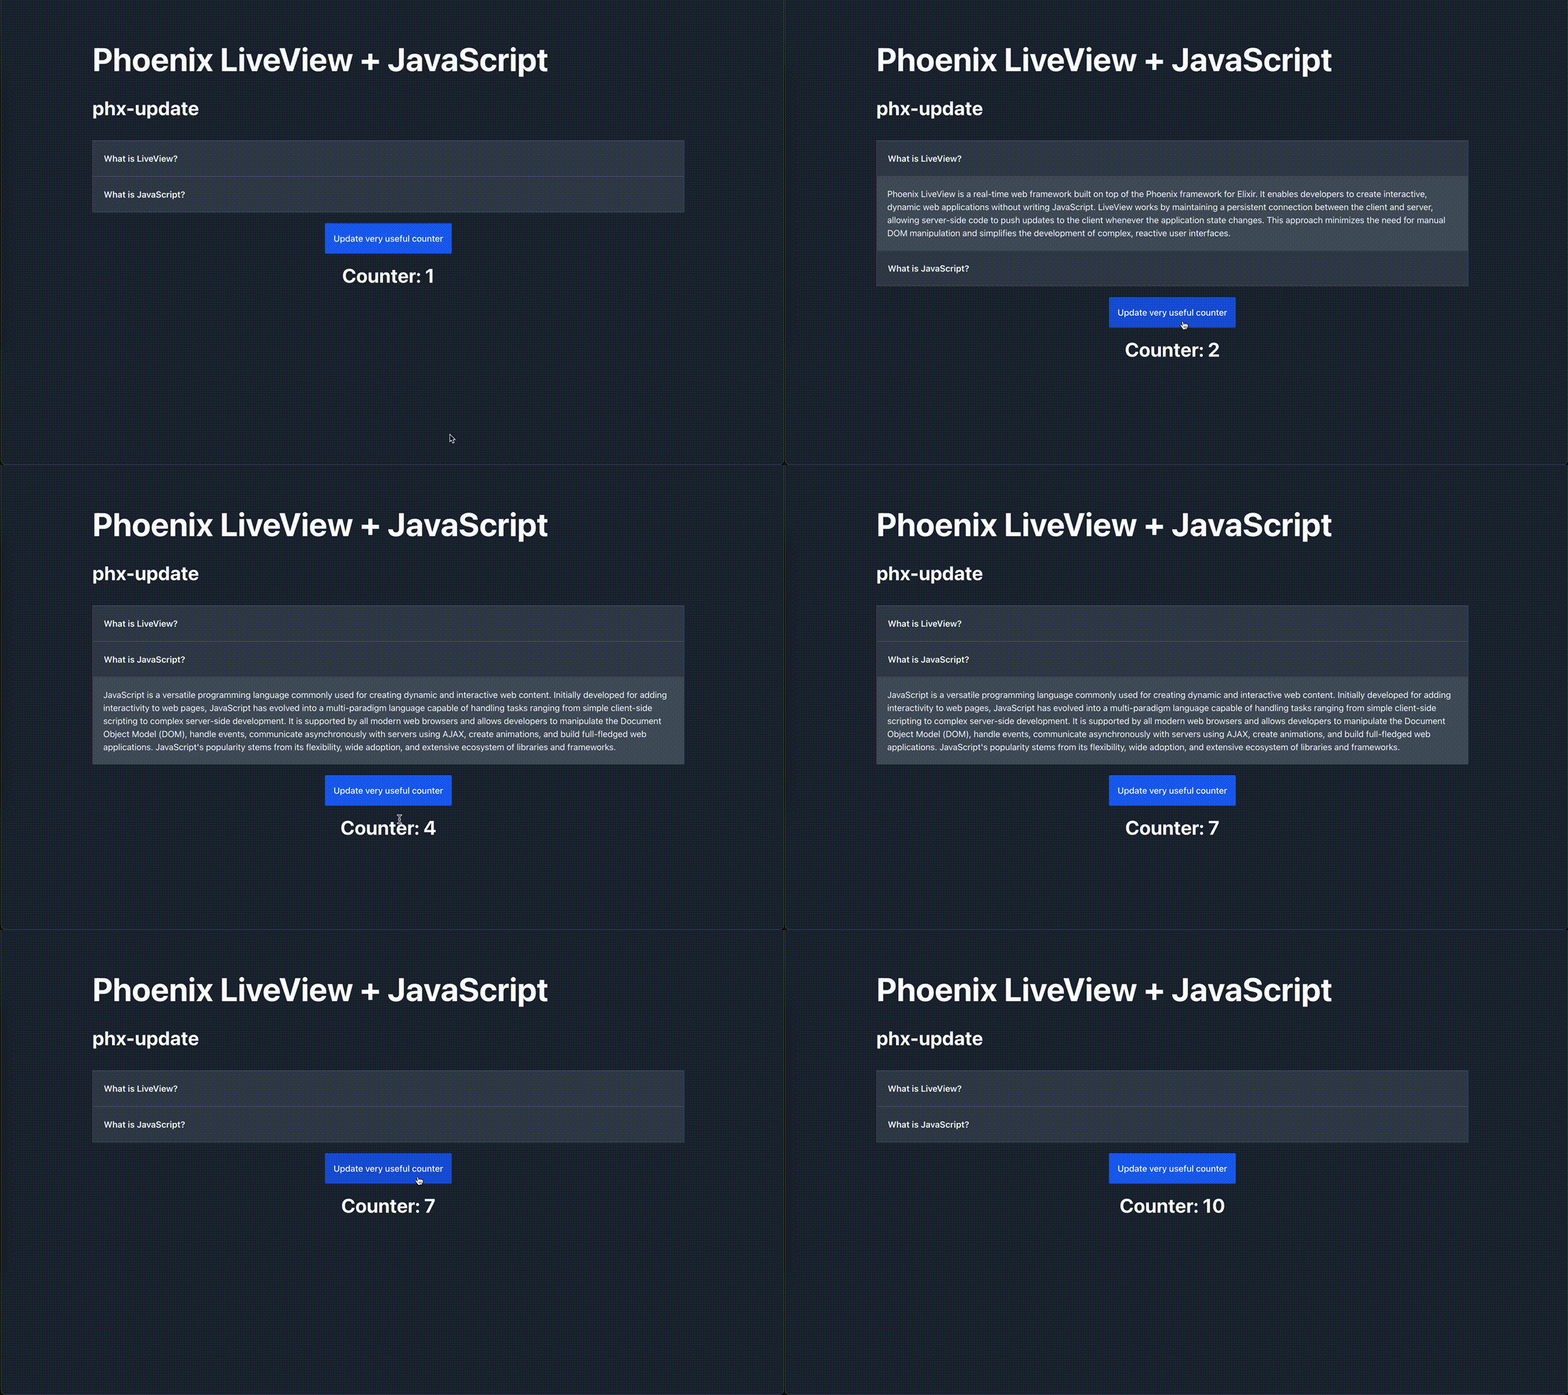
Really mixing JavaScript and LiveView with LiveSocket’s onBeforeElUpdated callback function
Wouldn’t it be cool to mix-and-match phx-update="ignore" and phx-update="replace"? Although this would be nice, it would introduce a lot of of complexity according to what José Valim himself states in this GitHub issue.
The solution for this resides in the not-so-popular onBeforeElUpdated callback function that can be passed to the LiveSocket constructor function (which you can read more about here). This callback gets executed any time LiveView performs its DOM patching operations.
You can do a lot of things using the onBeforeElUpdated callback function, but in this example, we will be focusing on how to prevent LiveView from changing the state of a JS-managed modal. This modal is for creating a new user in the system, and it has a debounced input that when changed, it tells the user whether the username is available or not using a handle_event callback in the server.
Let’s look at some code:
def handle_event("validate_user", %{"user" => %{"name" => name}}, socket) do
  validations = [message: message, error: error] = validate_username(name)
  {:noreply, assign(socket, validations)}
end

def render(assigns) do
  ~H"""
    <button data-modal-target="new-user-modal" data-modal-toggle="new-user-modal">Add new user</button>

    <.table rows={@users}>
      <:column>Username<:column>
      <:column type="action" />
    </.table>

    <.modal id="new-user-modal">
      <form phx-change="validate_user" phx-save="save_user">
        <input phx-debounce="500" name="user[name]" />
        <button type="submit">Save</button>
      </form>
    </.modal>
  """
end
The “add new user” button opens up the modal with id “new-user-modal” using JavaScript. This sends an event to that modal which changes the class, role and some aria properties. When this happens, the DOM in the browser is now different from the DOM stored in the LiveView state and this will cause the modal to close whenever the browser receives a page update from the server.
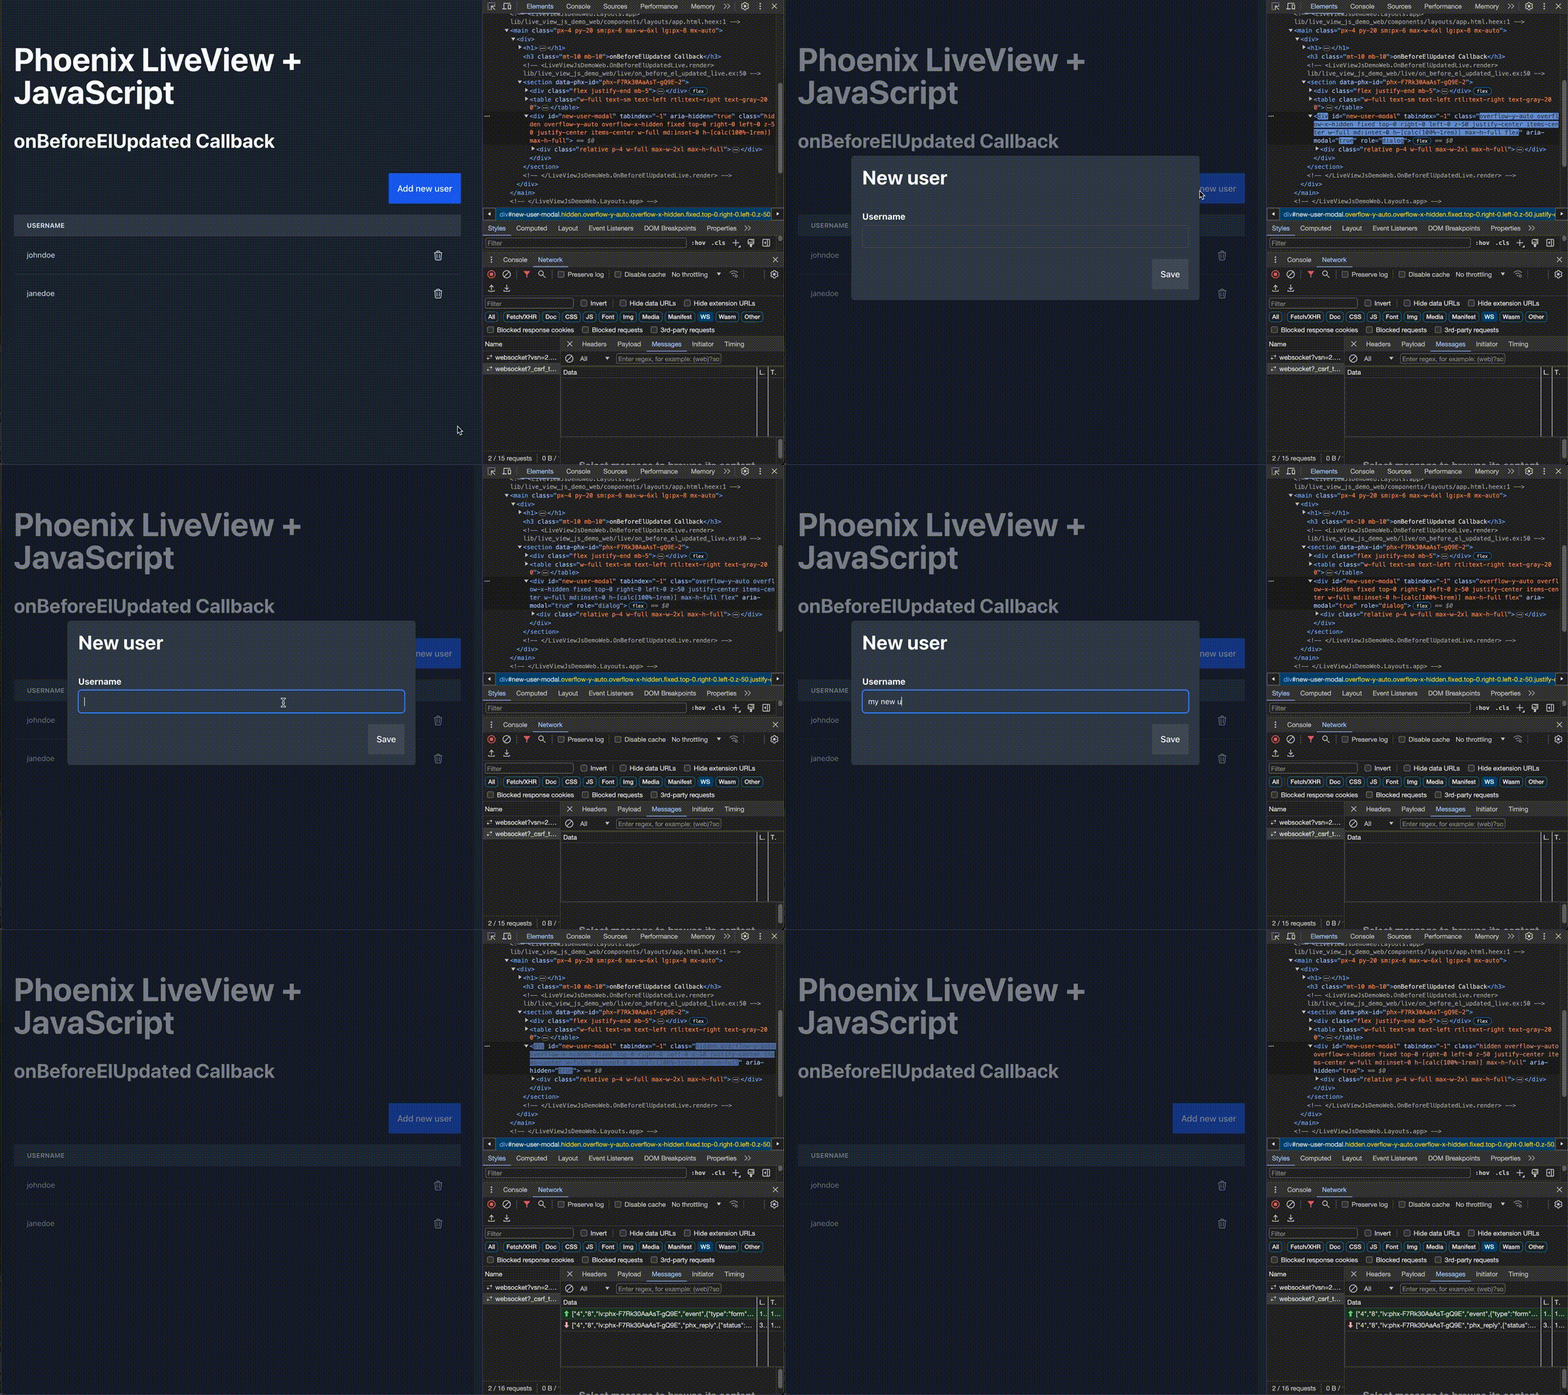
Let’s see how we can fix this. From what we see in the image above, we can see that we need to mantain the class, role, aria-modal and aria-hidden attributes for the modal element. Let’s write a onBeforeElUpdated callback function that keeps all the attributes starting with phx-keep- for any given element.
In the app.js file, modify your LiveSocket constructor like this:
let liveSocket = new LiveSocket('/live', Socket, {
  params: { _csrf_token: csrfToken },
  dom: {
    onBeforeElUpdated(from, to) {
      for (const attr of from.attributes) {
        if (attr.name.startsWith('phx-keep-')) {
          const attrName = attr.name.substring(9);
          if (from.hasAttribute(attrName)) {
            to.setAttribute(attrName, from.getAttribute(attrName));
          } else {
            to.removeAttribute(attrName);
          }
        }
      }
    },
  },
});
Now, we just need to update our render function to tell LiveView not to update those attributes for the modal.
def render(assigns) do
  ~H"""
    ...
    <.modal
      id="new-user-modal"
      phx-keep-class
      phx-keep-aria-modal
      phx-keep-role
      phx-keep-aria-hidden
    >
      ...
    </.modal>
    ...
  """
end
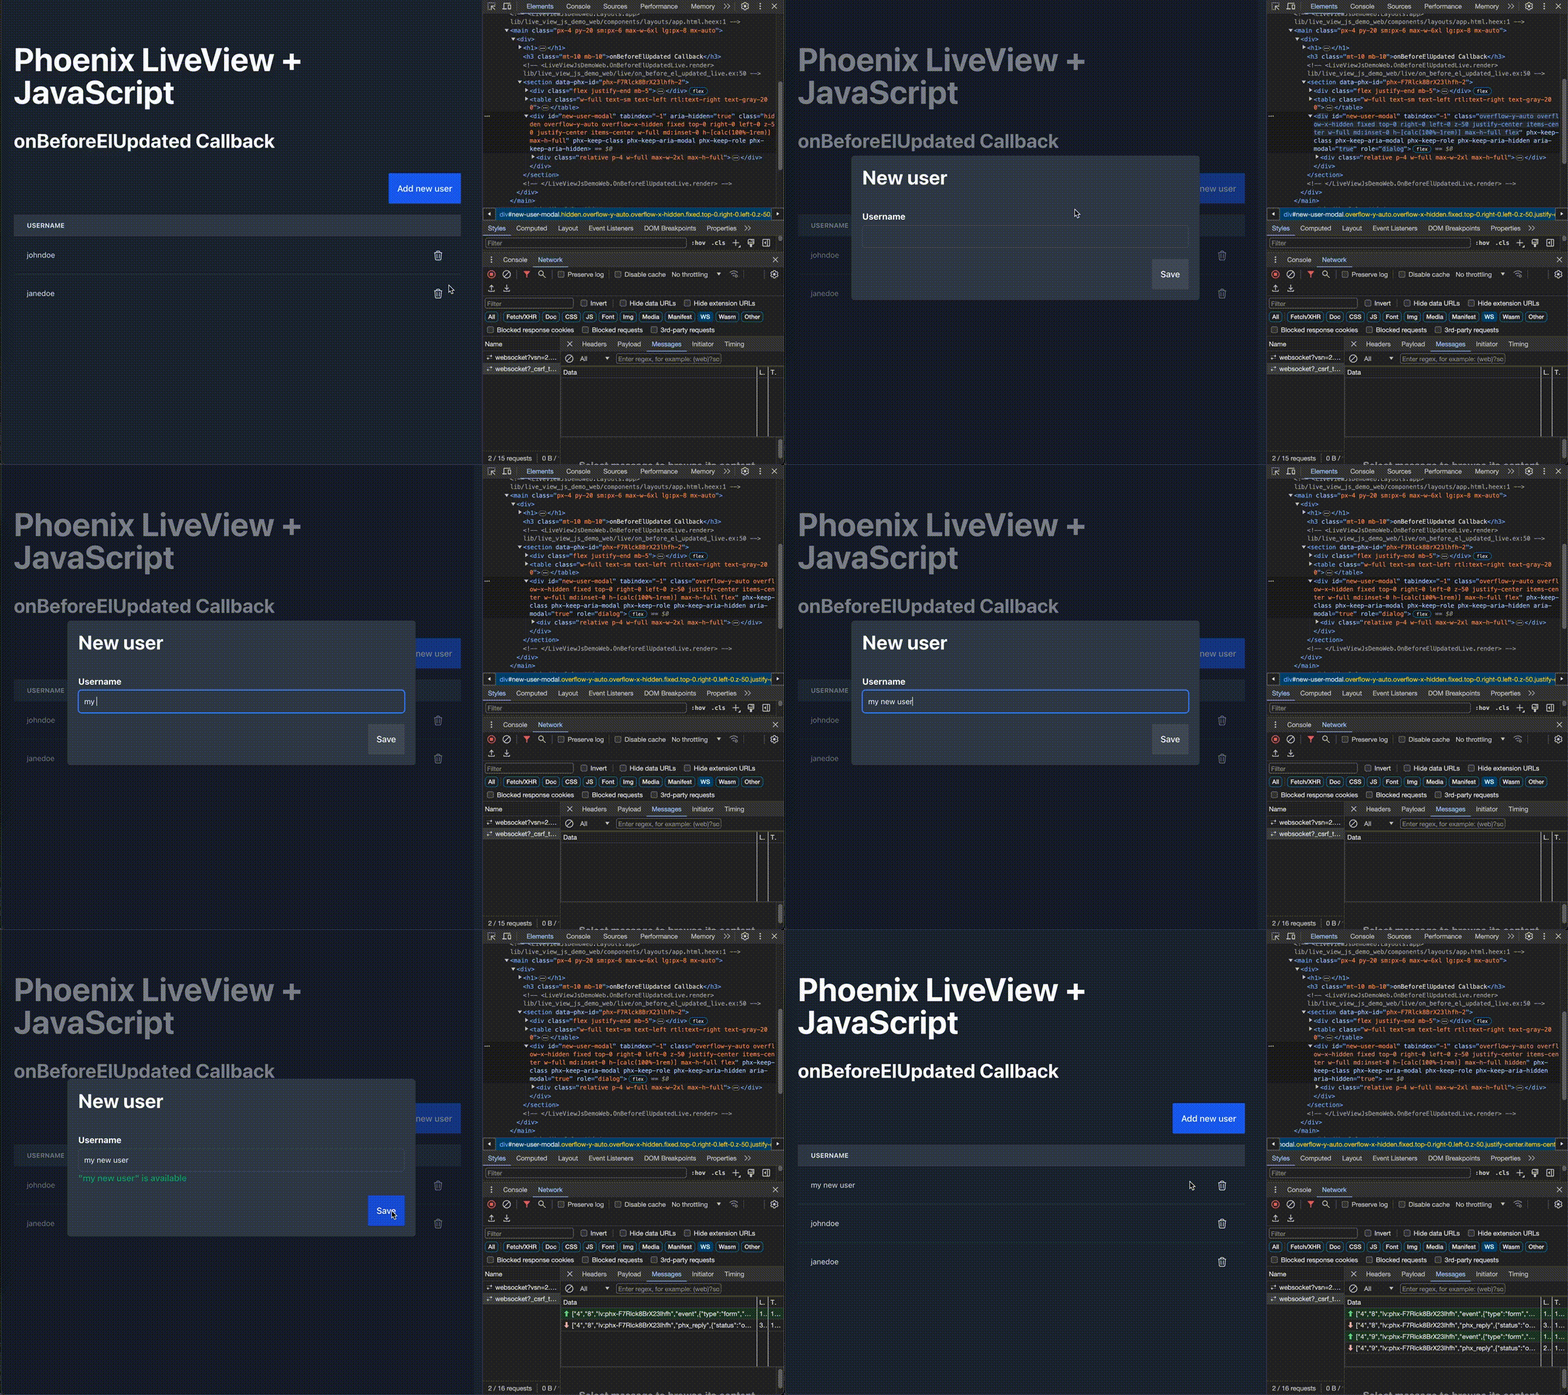
And now, our modal works just as expected with just a few lines of code. Isn’t that nice?
Closing thoughts
It’s clear that both LiveView and JavaScript bring immense value to web development in their own right. LiveView streamlines server-client communication and enables real-time updates without the complexity of traditional JavaScript frameworks. On the other hand, JavaScript empowers dynamic interactions and rich user experiences that would be challenging to achieve solely with server-rendered HTML.
Whether it’s enhancing user interfaces with custom animations, implementing real-time chat features, or dynamically updating content without page refreshes, the synergy between LiveView and JavaScript enables developers to achieve remarkable results swiftly and efficiently.
I invite you to dive in, explore the possibilities, and discover what wonderful things you can do using LiveView and JavaScript together.
Check out the code
You can check the actual code for the examples by running this repo!
